
[Last Updated: 2021-08-23 16:20:00 EST]
Warning: The following is just a guide on how to convert your WAXP Tokens into Fiat Currency (US Dollars, CAN Dollars, etc…) or other Cryptocurrency coins or tokens. I am not a financial advisor and I do not give any financial advise. If you want to convert your WAXP Tokens to other crypto currencies, please do your own Due Diligence and research.
Referral Links:
Newton Exchange – https://web.newton.co/r/TLHIWK
KuCoin Exchange – https://www.kucoin.com/ucenter/signup?rcode=1NQux
Binance Exchange – https://www.binance.com/en/register?ref=12231617
Hello everyone. Back again with another guide as Topps has launched their version of NFTs on April 20, 2021. This is a guide to transfer your WAXP Tokens either to convert them into Fiat Currency or to exchange it for other cryptocurrencies. I will try my best to explain and give step by step instructions on how to do this.
What is Topps MLB NFT?
So you’ve probably heard by now that the NBA has been doing something called Top Shot which they have been selling packs that contain NFT Moments of highlight videos. Well, enter Topps MLB x NFT! These NFTs are a tad different from Top Shot as they are images of trading cards (some may have some funky animation like Independence Day Stars). Just like Top Shot, the user has a chance to buy packs that contain cards of a particular series. So far we only have Series 1 Standard (6 cards per pack) and Premium Packs (45 cards per pack). Premium Packs also contain a chance to get Legendary cards where Standard packs will not have these.
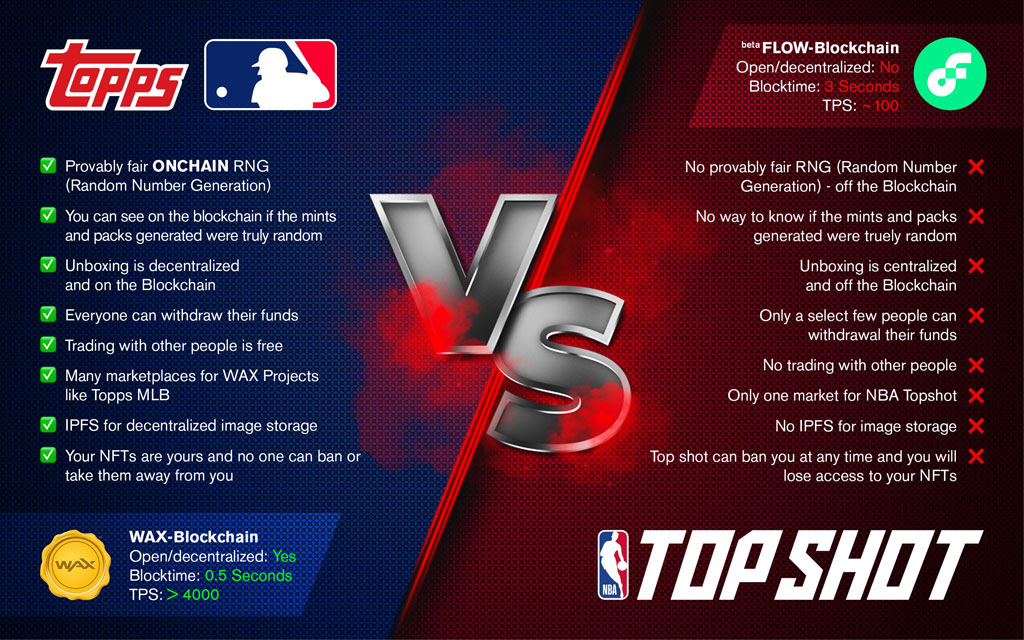
Now the key difference between Topps MLB NFT and NBA Top Shot is that Topps is using the WAX Blockchain to store their NFT and allow users to buy and sell them, where NBA Top Shop is using the Dapper Ecosystem. Some key differences are:
- The NFTs for Topps MLB are tied to the price of the WAXP tokens. So if WAXP goes up in price, so do the NFTs and vis versa. And since Cryptocurrencies are highly volatile, you could see major price changes (IE: As I write this guide right now on 2021-04-22, WAXP dropped from $0.20 USD to $0.14 USD 😱). NBA Top Shot on the other hand is tied to the USDC coin, which is a stable coin backed by the US Dollar. That means your balance in your Dapper Wallet will not fluctuate in price.
- Since Topps MLB is using the Wax Blockchain, they don’t really have much control over the user’s wallet. You can see that on NBA Top shot that there is a lot of control over the user’s wallet as it took months to get people verified. You cannot simple buy/sell and cash out right away on NBA Top Shot, but on the Wax Blockchain, you can do this instantly.
This picture has more information on a comparison between Topps MLB. NFTs and NBA Top Shot
What are an NFTs?
Don’t know what an NFT is? If you’ve heard about Crypto Kitties or Crypto Punks, those are NFTs. I think it’s best to provide an Investopedia link to fully explain NFTs or watch this 2 hour long YouTube video by Engadget. And if you don’t know what Cryptocurrency is, then I suggest you head over to YouTube and watch the countless videos on virtual currencies.
How do I convert my WAXP Tokens into Fiat Currency?
In this tutorial, I will be focusing on how to convert your WAXP Tokens into Canadian Currency. If you want to convert your Coins into a different currency, the only real difference will be the exchange you will be using to convert your cryptocurrency into your desired fiat currency.
Currently, the only way to convert WAXP Coins is to send them to an exchange that offers WAXP trading. You can view this list here. In my guide I will be using KuCoin which is a fairly large exchange based in Asia. For my fellow Americans, you could try Bittrex. I see that this exchange has a USD pairing with WAXP. Now, I’ve never used Bittrex, so please be cautious when using it as I do not know what rules they play by. If you do end up using Bittrex, you will only be using one exchange to convert your WAXP Tokens to USD.
As of August 23, 2021, you can now exchange your WAXP with Binance. However, I want to point out that Binance is banning individuals who are residence of the province of Ontario in Canada from using their exchange starting at the end of 2021. This in my opinion will most likely apply to all of Canada eventually, so I will be sticking with KuCoin in this tutorial. Also note that Binance is blocked in the UK and potentially other countries. If there is enough interest, I can make a Binance tutorial as well.
Just an FYI that I will be using two exchanges to convert your WAXP Coin to Canadian Dollars. The first one as I mentioned will be KuCoin. The second will be Newton, which is a Canadian Exchange that we will use to convert your cryptocurrency to Canadian Dollars.
Before we start… If you convert your cryptocurrency to Canadian Cash, you may be subjected to capital gains/losses during tax season. I don’t know how stringent the CRA is when it comes to claiming your crypto gains, but I would definitely keep track of this just in case!
Step 1: Sign up for KuCoin Exchange
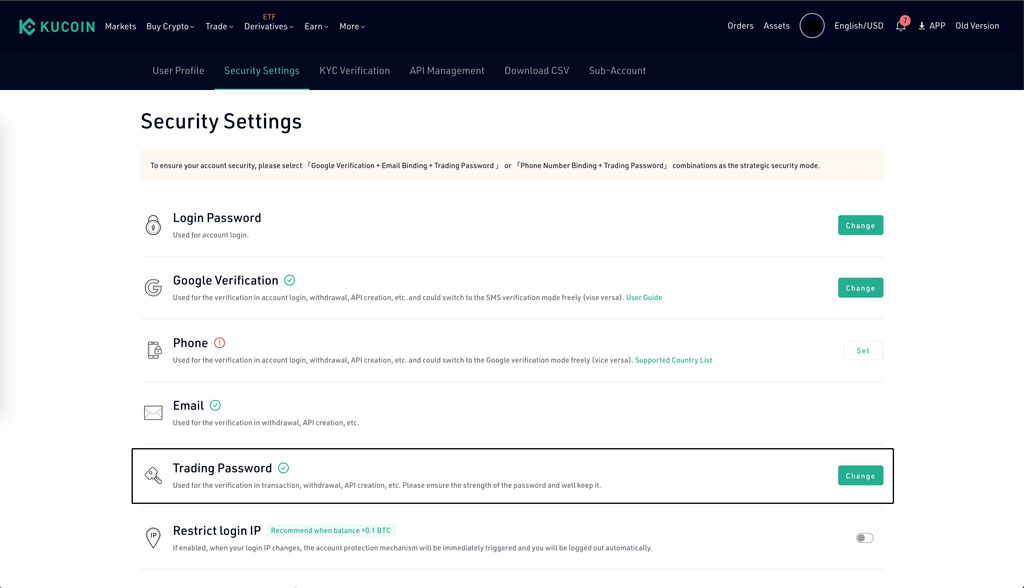
In order for you to even move your WAXP Tokens off your Wax Wallet and onto an exchange, you will need to sign up for a KuCoin account. You can use my referral link to sign up: https://www.kucoin.com/ucenter/signup?rcode=1NQux. I believe you do not need to be verified in order to start trading and deposit/withdraw your tokens. However you do need to set up a trading password. Once you are logged in, go to your, go to your “Account Security” by clicking on the circle on the top right with your Initials.

Next, locate “Trading Password”. Here you will set a 6 digit pin for trading. You will need this to trade on the KuCoin platform and to withdraw.
Once this is done we can begin the transferring of the WAXP Tokens from your Wax Wallet to the KuCoin Exchange.
Step 2: Retrieve your WAXP address and memo
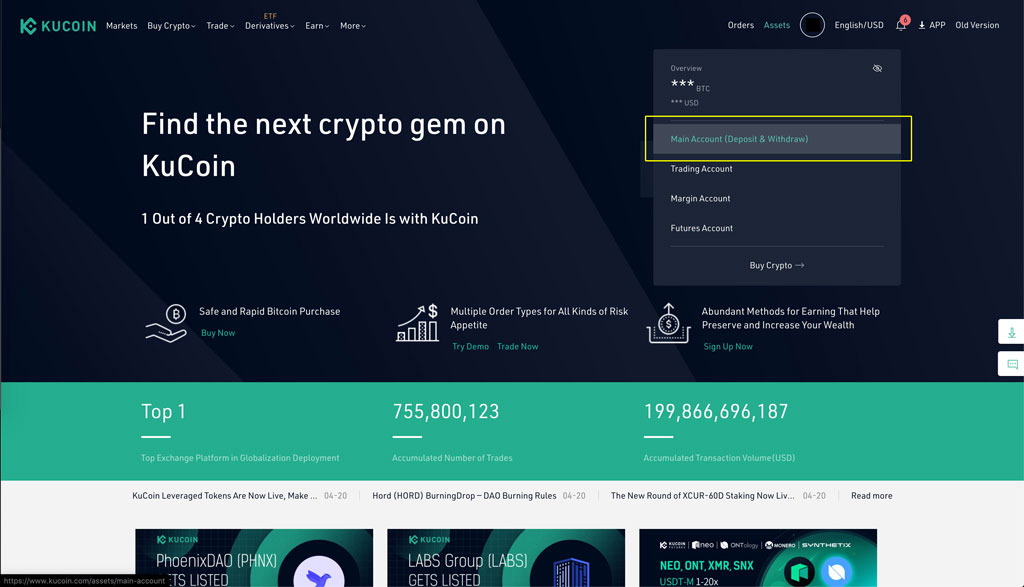
To retrieve your WAXP address and memo, first you need to click on “Assets” at the top right and select “Main Account”
Next, in the search input field, search for “WAXP”. Once you see WAXP in your listing, click on the “Deposit” button.
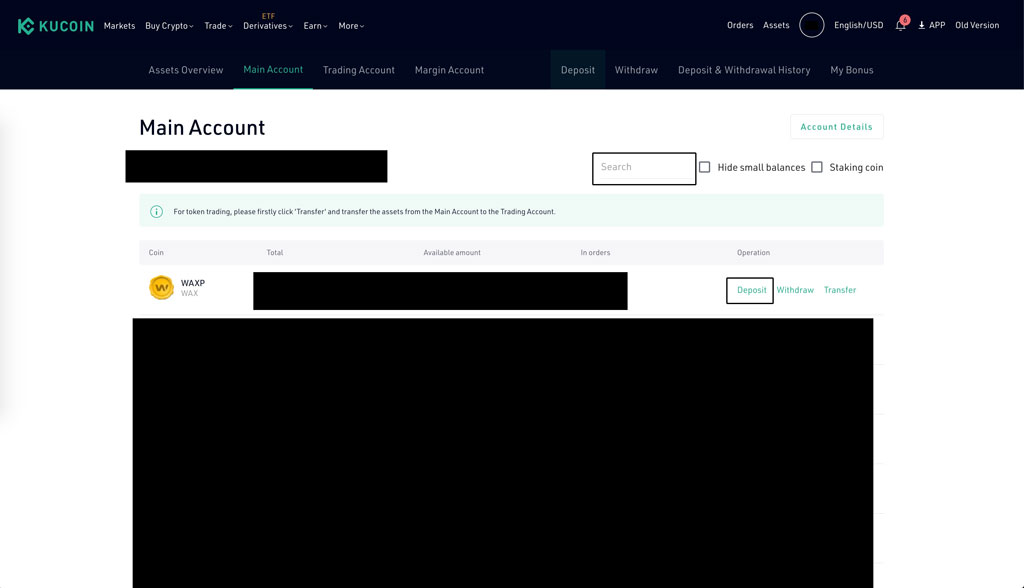
Next, you will need to check the checkbox and click the “Continue” button.
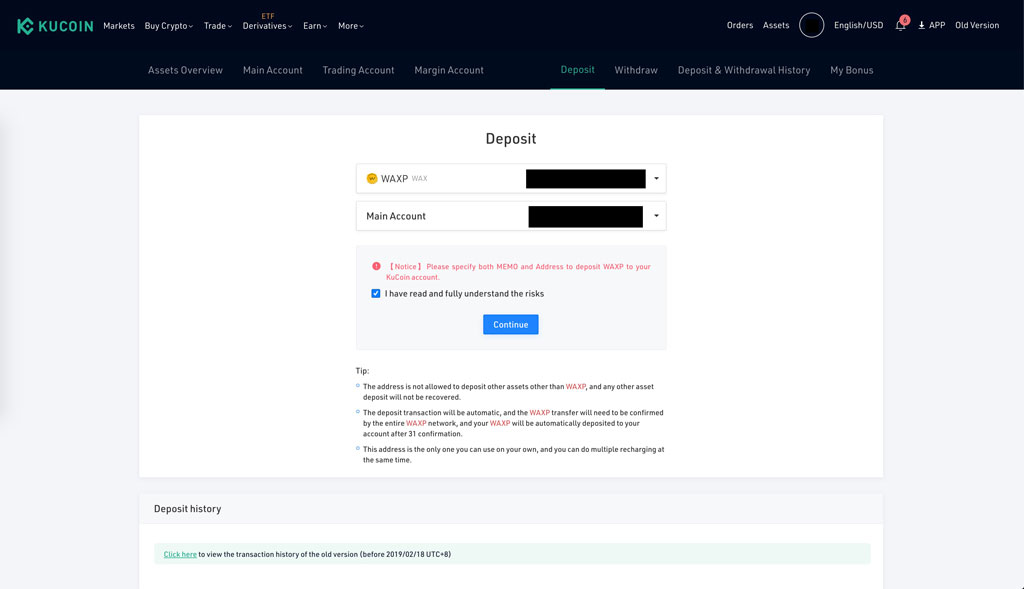
Now, you will see your address and memo. It is very important that you enter both of these pieces of information when you withdraw from your WAX Wallet. If you enter one of these incorrectly, your tokens will most probably be gone forever!
WARNING: In the example below is my WAXP wallet address and memo. DO NOT USE THIS ADDRESS TO SEND YOUR WAXP TOKENS. Use the address and memo that is tied to your account. I will not be held responsible for any errors made.

Step 3: Withdraw from your Wax Wallet.
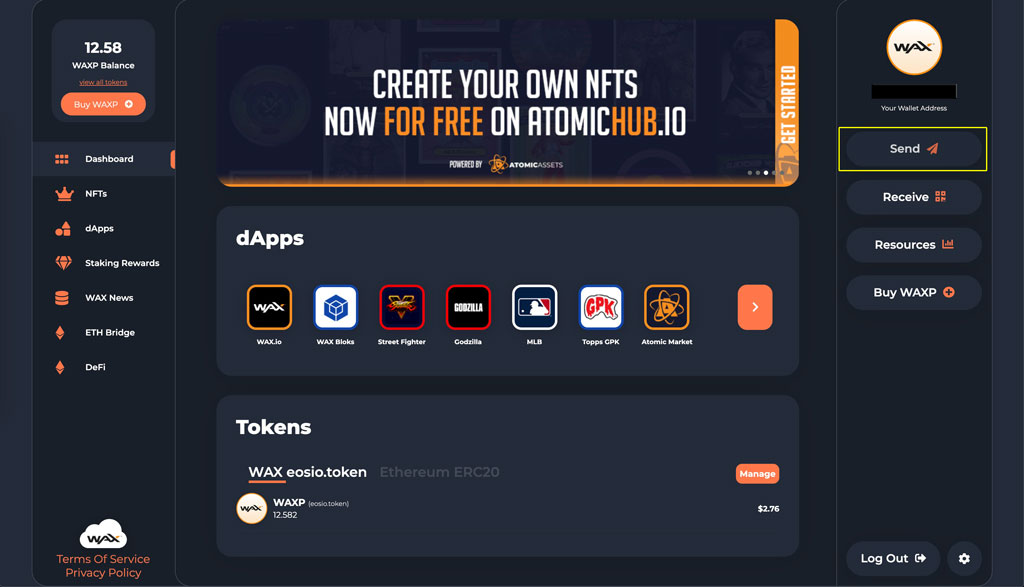
So the Wax Wallet I am using is Wax Cloud Wallet. I think this is the standard wallet that most users are using. Log into your wallet and when you are ready to send your WAXP to your KuCoin WAXP address, click on the “Send” button at the right.
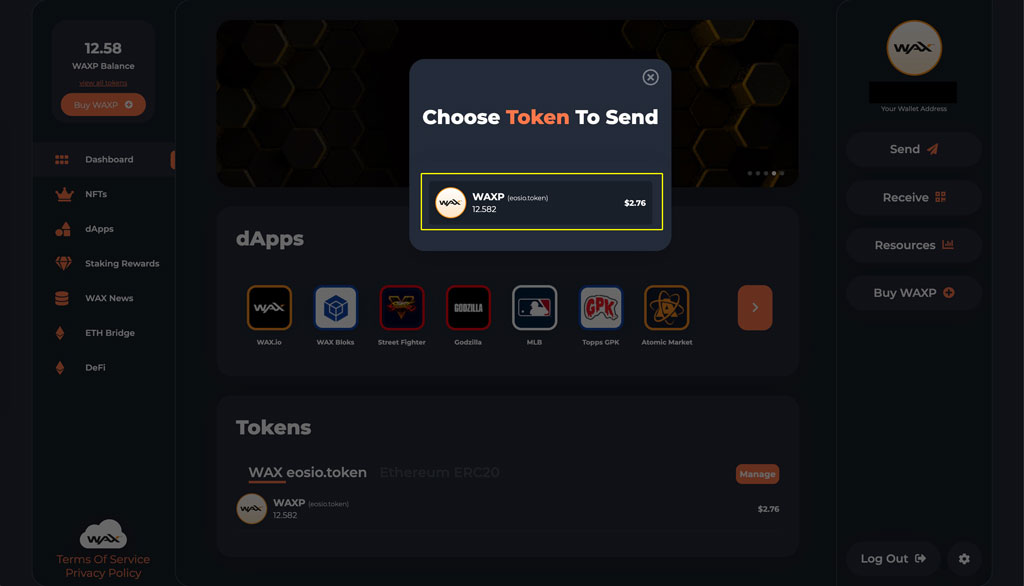
Next, select the token you want to send. I have highlighted it below.
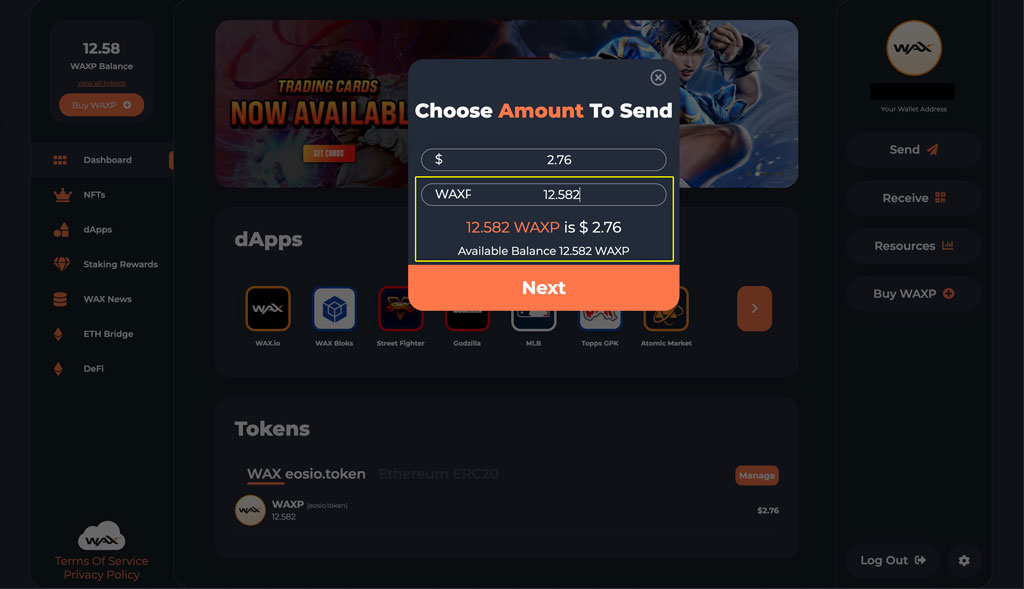
You will now need to enter how much WAXP you want to send to your KuCoin account. The one thing I have noticed here is that there are no fees to send your WAXP Tokens (at least I did not see any fees). Enter the amount of WAXP Tokens that you want to send. Once you are ready, click on the “Next button”.
Finally, copy the KuCoin Address into the address field and the KuCoin memo into the memo field. This information is from the last screenshot of Step 2. Remember, both fields have to be copied properly or you may lose your tokens.
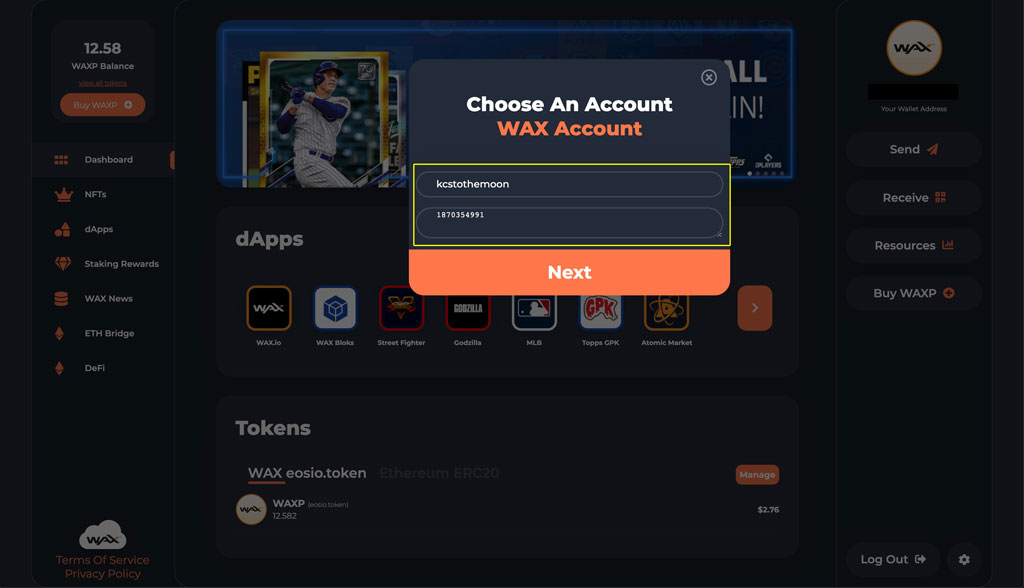
Next, you will need to verify this transaction. A pop-up window will appear (Please make sure you enable pop-ups for this site). You will need to pass the Captcha and then click on the “Approve” button.
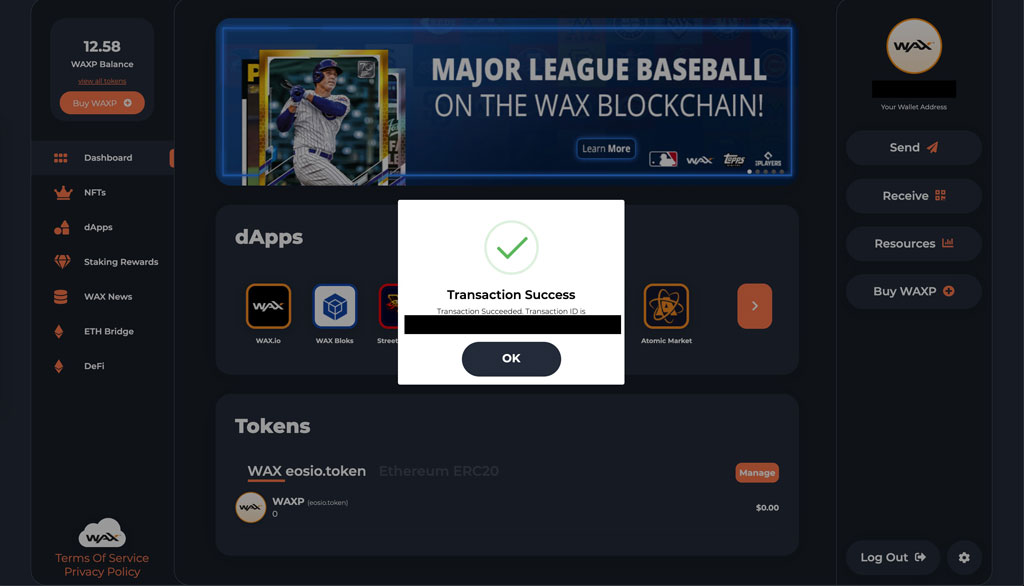
If everything goes through, you will see this success message. You can click on the link to see the transaction on the Wax blockchain explorer.
Step 4: Converting your WAXP Tokens on KuCoin to XRP (Ripple)
So you are probably asking why do we need to convert your WAXP Tokens to XRP? The main reason is that Newton does not support WAXP Token trading. Another reason for using XRP instead of say Bitcoin (BTC) or Ethereum (ETH) is that BTC and ETH have really high fees when you transfer from one exchange to another. XRP has very low fees, so you are saving some money.
For me, it took about a few minutes to see my WAXP Tokens in my KuCoin account. I don’t know the average speed of when the tokens transfer but you can always look at the link in the WAX blockchain explorer to see the progress. To check if your WAXP Tokens have made it to KuCoin, go to the “Deposits & Withdrawal History”. Here you will see if your tokens are in.
Next, go back to your “Main Account”. Locate your WAXP Tokens and click on “Transfer”. You will be transferring your WAXP Tokens to your trading account.
A popup will appear. Make sure you are transferring from your “Main Account” to “Trading Account”. Enter the amount of WAXP you want to transfer. If you want to transfer all, you can click on the amount number. In this example, I will be transferring 150 WAXP Tokens. Click the “Continue” button to complete the transfer.
A success message will appear. Next, click on the “Trading Account” button in the menu to go to your “Trading Account”.

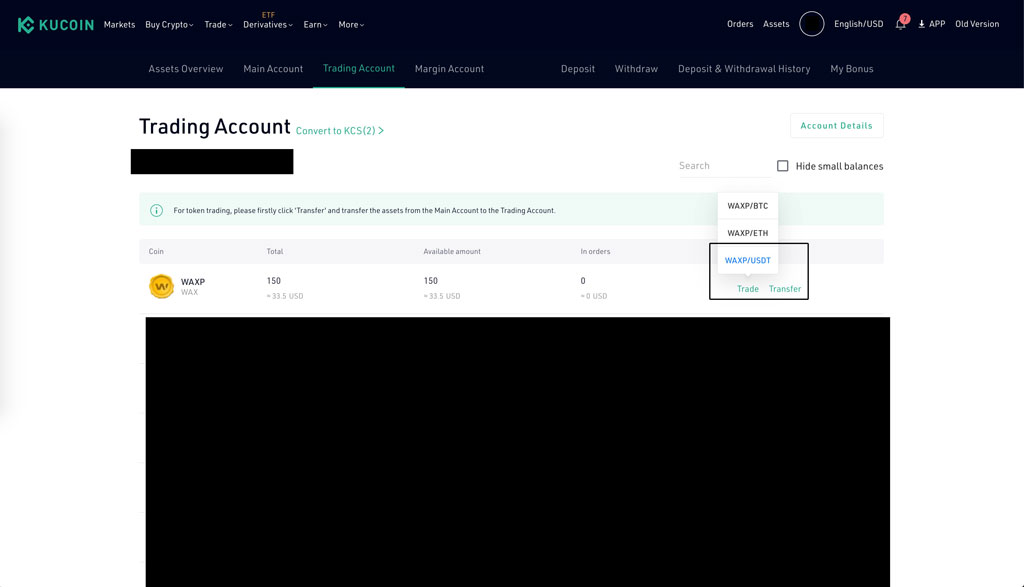
Now that you are in your trading account, locate your WAXP Tokens and select “Trade”. Look for the pair “WAXP/USDT”. This means we will be selling our WAXP for USDT (A stable coin that is similar to USDC).
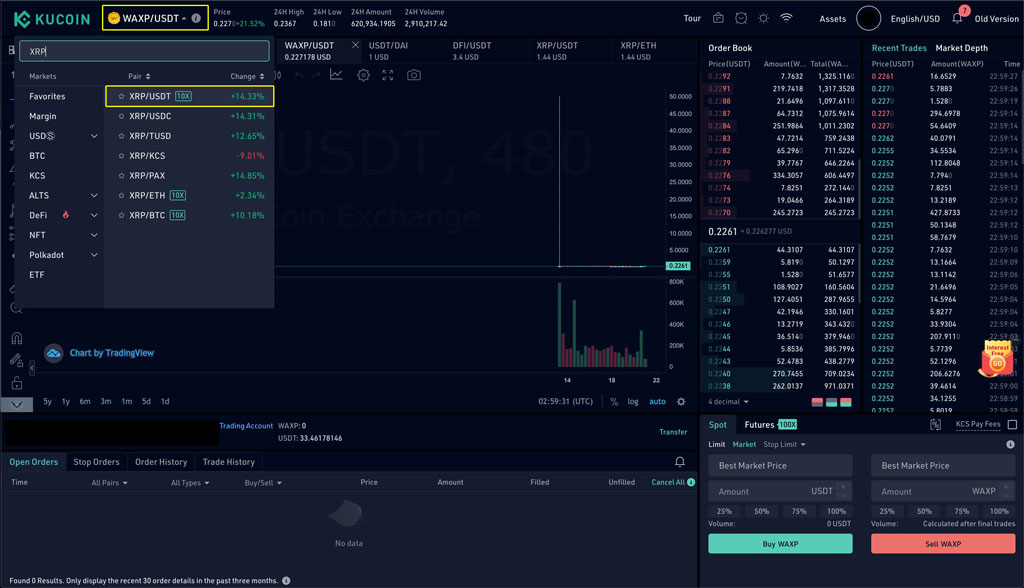
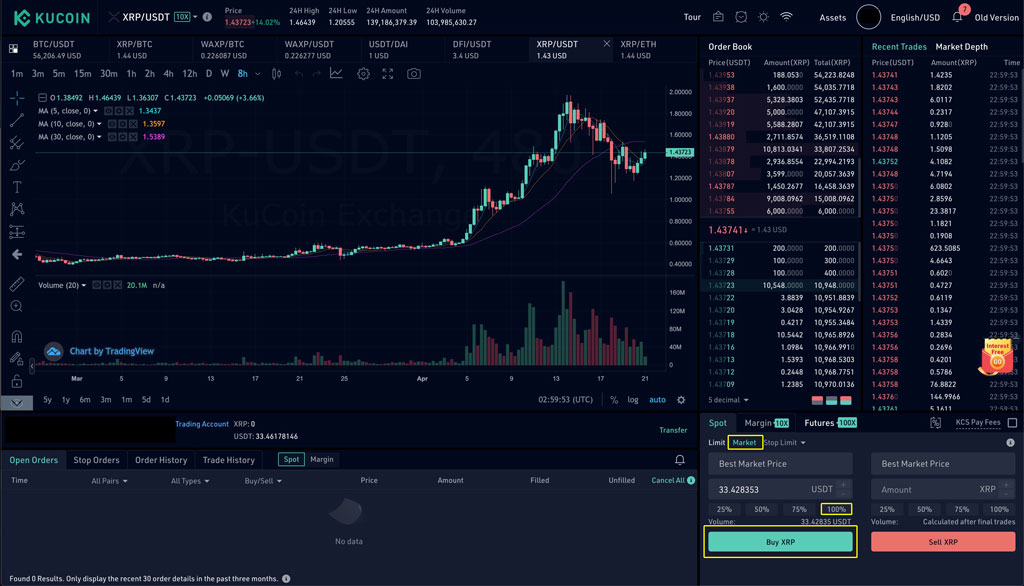
Now you will be forwarded to the trading platform view. It may look really busy, but it is pretty simple to use. First, you will need to enter your trading password. Next, in the screenshot below:
1 – Make sure that this is “WAXP/USDT”
2 – Click on the “Market button to trade with market price. You can try using limit to get a better price, but really, it is just faster to do Market
3 – Click on 100% to trade all your WAXP for USDT
4 – Click on the “Sell WAXP” button to complete the trade.

Congratulations, you have now converted WAXP for USDT. Next, click on the “WAXP/USDT” dropdown. Search for “XRP” in the search input box. Next, locate the “XRP/USDT” pair and click on it.
Now, just like when you sold your WAXP Tokens for USDT, now it is time to Buy XRP with USDT. Again, click on the “Market” button, click on the “100%” button and click on the “Buy XRP” button.
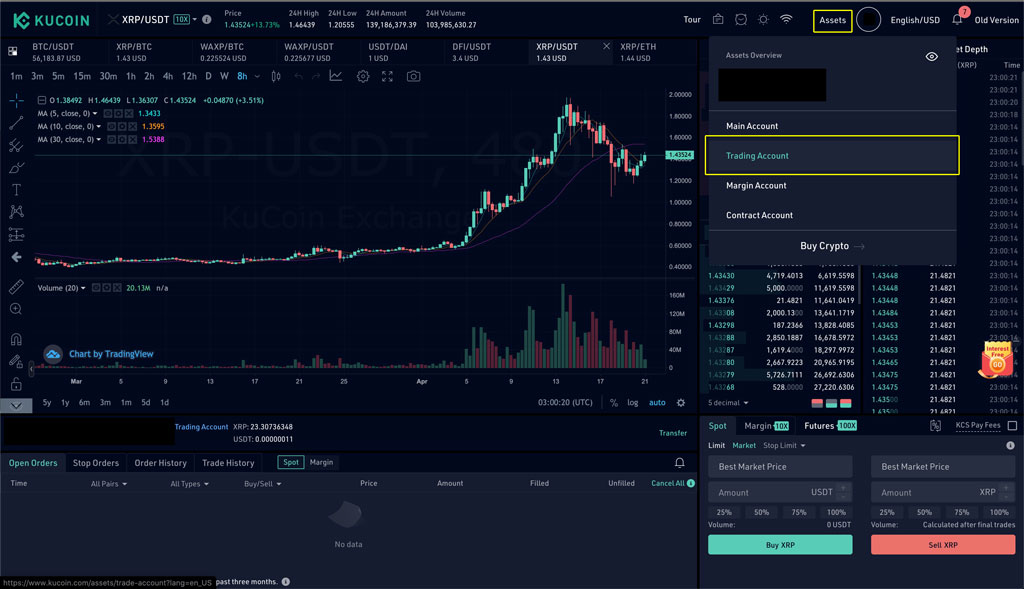
There you go! Now you have successfully converted your WAXP Tokens to XRP via the middle man (USDT). Now, we need to transfer your XRP back to your Main Account. Click on the “Assets” button at the top right and select “Trading Account”.
Step 5: Transfer your XRP to your Main Account to prepare the withdraw to Newton
Just like how we transferred your WAXP Tokens from your “Main Account” to your “Trading Account”, you will now have to do the Uno Reverse and transfer your XRP Coins from your “Trading Account” to your “Main Account. Now in your main account, locate your XRP Coins and select “Transfer”.
Next, make sure that you are transferring from your “Trading Account” to “Main Account”. Again, you can click the amount to select your Max account to transfer or you can enter the amount of XRP Coins you want to transfer to your Main Account. Click on the “Confirm” button to finish the transfer.
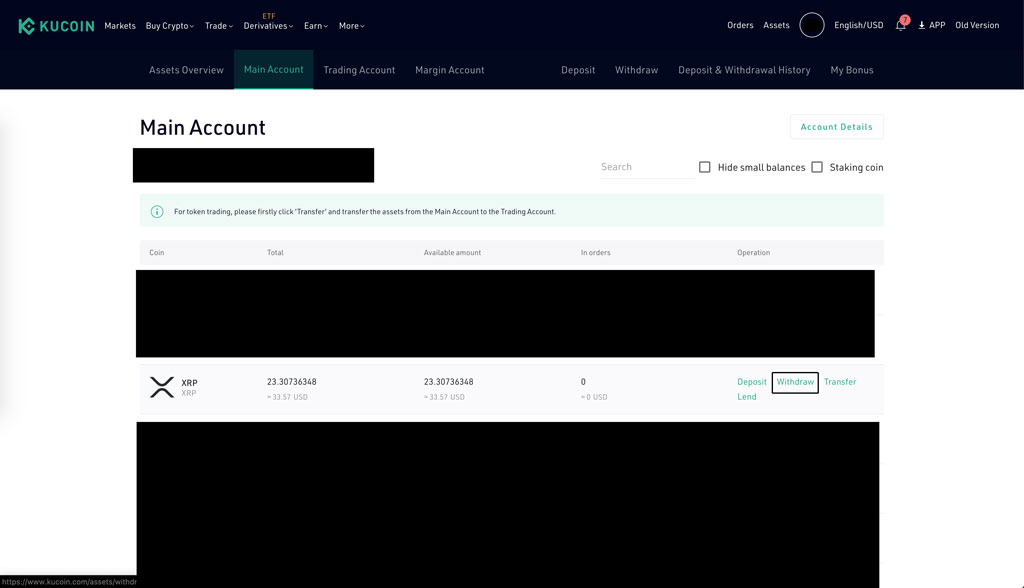
Next, go to your Main Account by clicking on the “Main Account” button from the upper left menu.
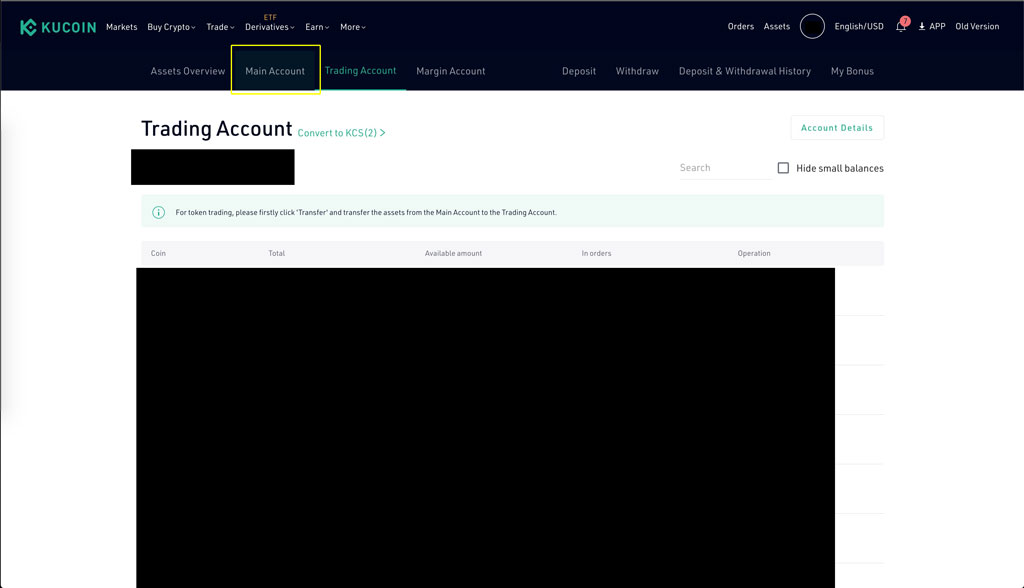
You are back in your Main Account. Now we will need to begin the withdraw process of XRP to Newton. First, locate your XRP Coins and click on the “withdraw button”.
Similar to when we were depositing our WAXP Tokens into our KuCoin account, click the checkbox and click on the “Continue” button.

Now you will be able to enter the amount of XRP you want to withdraw, the XRP Address to send it to and the tag that may be needed sometimes. In our case, Newton doesn’t require this. Let’s go to your Newton account.
First off, you need to have a Newton account created and verify your identification before you can send your XRP to your Newton account.
Step 6: Create a Newton Exchange account.
If you are currently signed up for an exchange that can do the above then you can skip to Step 7. However, if you are not signed up, I recommend using Newton.co. Newton is a Canadian Exchange that prides themselves with No Fees. Instead they just take a spread when buying and selling cryptos. My referral link (https://web.newton.co/r/TLHIWK) has an added bonus for you and me where if you buy or sell $100 CAD or more, we both get $25 CAD.
Once you’ve completed the sign up I believe Newton will ask you to verify your email. After this you should be able to log in.
You will need to verify your identity on Newton. Unfortunately, I do not have screenshots for this step as I have verified myself before this guide. If you follow the instructions, you should be good.
Step 7: Retrieve your XRP address to continue your withdrawal from KuCoin
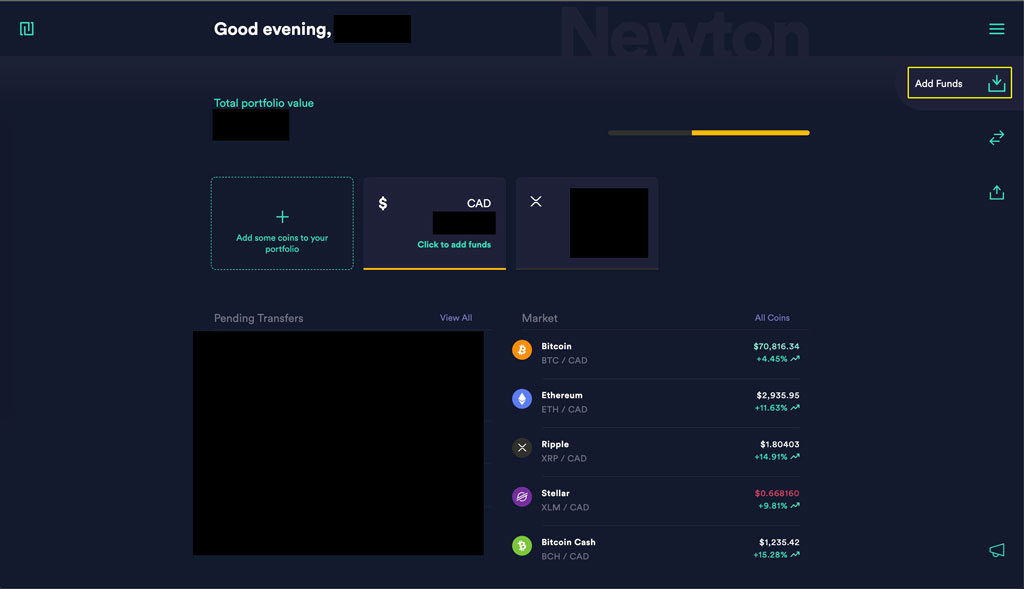
First, click on the “Add Funds” button on the right.
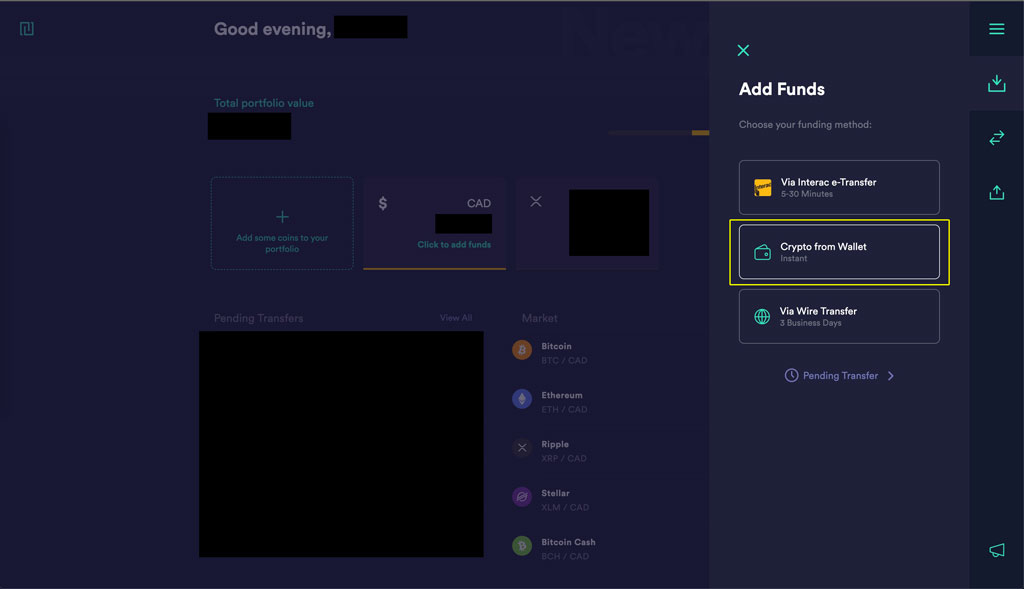
Next, select “Crypto from Wallet”.
Now make sure you select “XRP” from the dropdown. Your XRP wallet address will appear. You will need to copy this value for when you withdraw your XRP Coins from KuCoin. Click on the copy icon to copy this correctly.
WARNING: In the example below is my XRP wallet address. DO NOT USE THIS ADDRESS TO SEND YOUR XRP TOKENS. Use the address that is tied to your Newton account. I will not be held responsible for any errors made.

Step 8: Withdraw your XRP from KuCoin and send to Newton.
Go back your KuCoin account and to the screen where you were about to withdraw your XRP Coins. Enter the XRP Address from Step 7. Next, you can click the “Max button” to select all your XRP to send to Newton. If you are good, click on the “Confirm” button. Now if you want to do a test to see if the address is correct, you can always send the minimum amount of XRP first. This test will make sure that you are sending your XRP correctly to Newton. Sometimes it is better to be safe than sorry since if you copy the address incorrectly, you will lose all your XRP Coins. Finally, leave the tag and remark input fields blank.
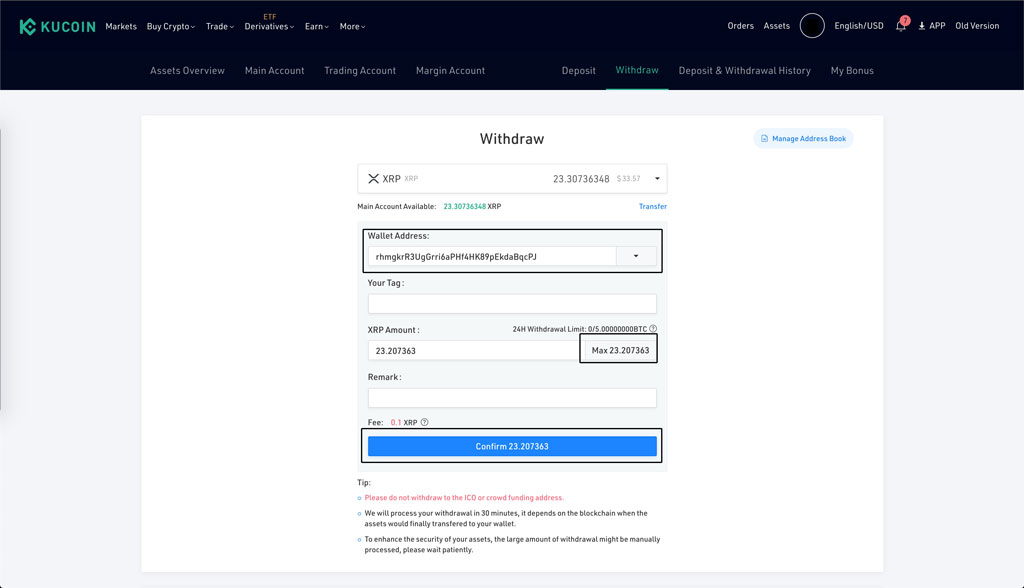
Notice that the Fee here is 0.1 XRP which is pennies based on XRP’s price range of 1ish USD as I write this. If this was ETH or BTC you would probably be paying more than 10-20 USD.
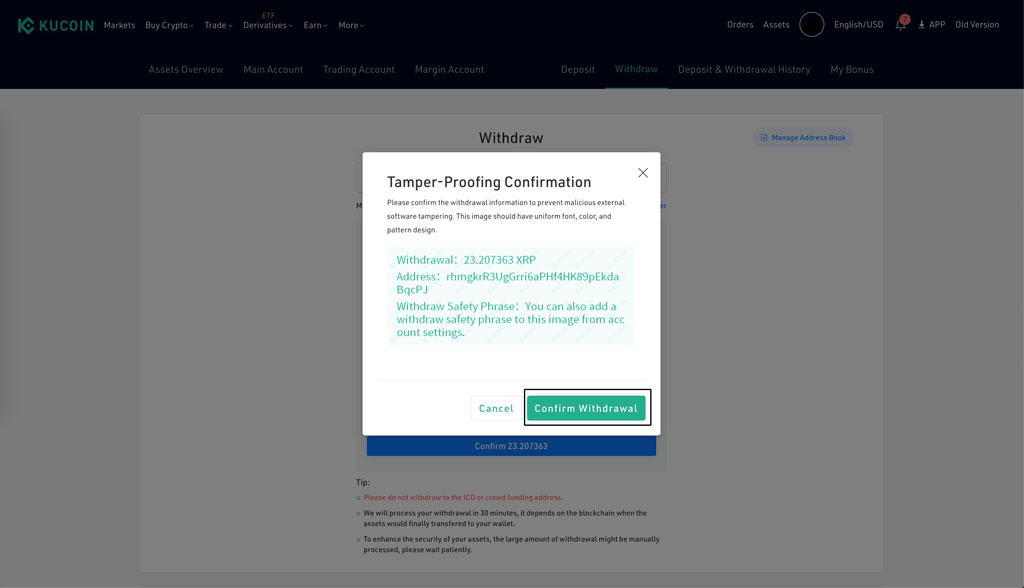
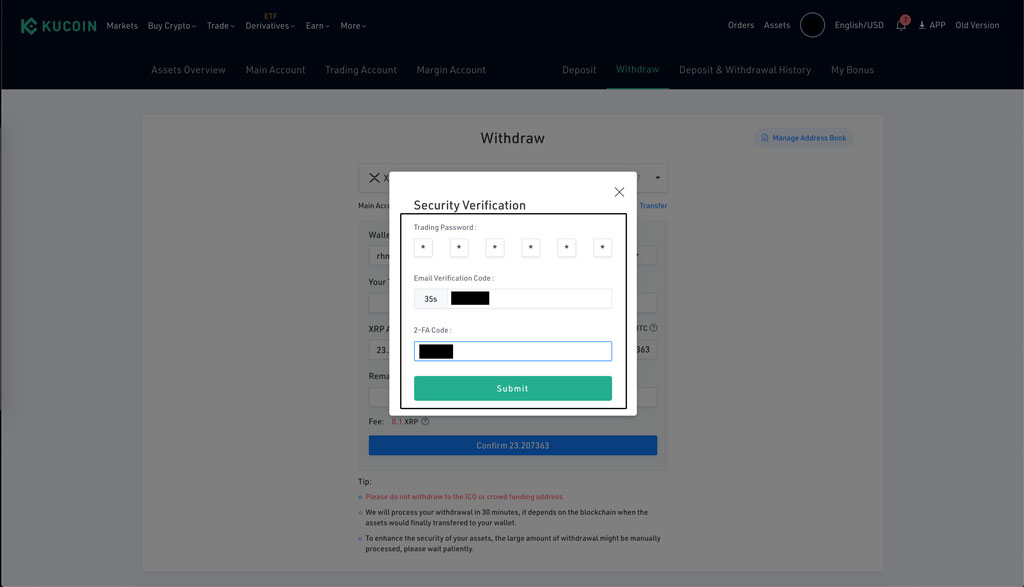
In order to complete the trade you will need to double confirm and enter in your trading password, send a code to your email, and enter your 2FA code (if you set this up, which I highly recommend you do).
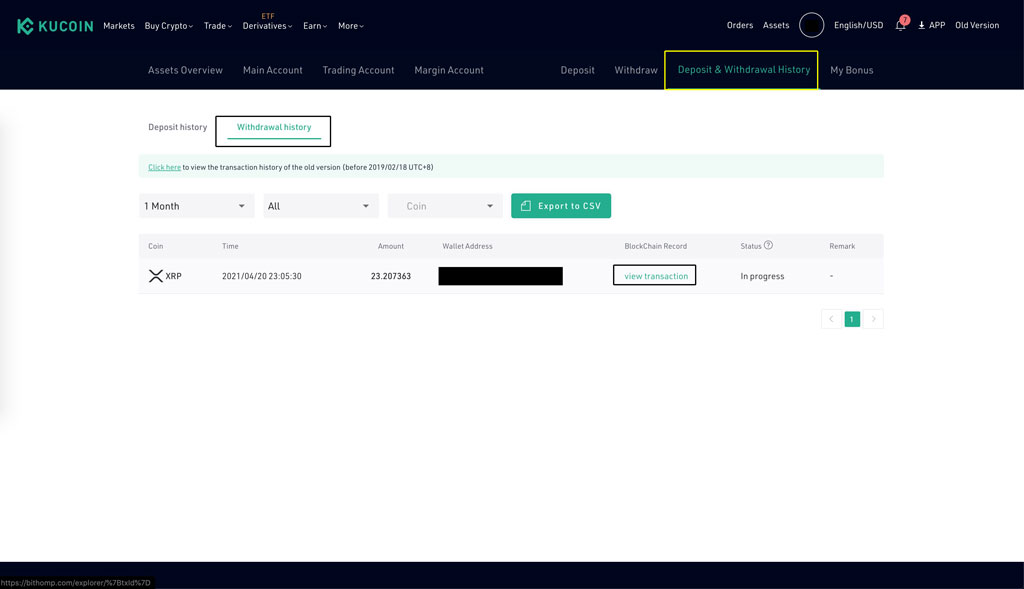
That’s it! You are now sending your XRP Coins to Newton. You can check the status by clicking the link by going to the “Deposit & Withdrawal History”. Next click on “Withdrawal History” and you can click on the “view transaction” link.
XRP transfers are usually quick because XRP is a centralized coin. However Newton does have a disclaimer saying that it may take up to 48 hours to see your XRP Coins in Newton. For me it took about 10 minutes.
Step 9: Converting XRP to Canadian Cash
Just like when we deposited our WAXP Tokens to our KuCoin account, we need to wait for our XRP Coins to enter your Newton account. You will know when your XRP Coins are in your Newton account by checking the “Recent Activity” section.

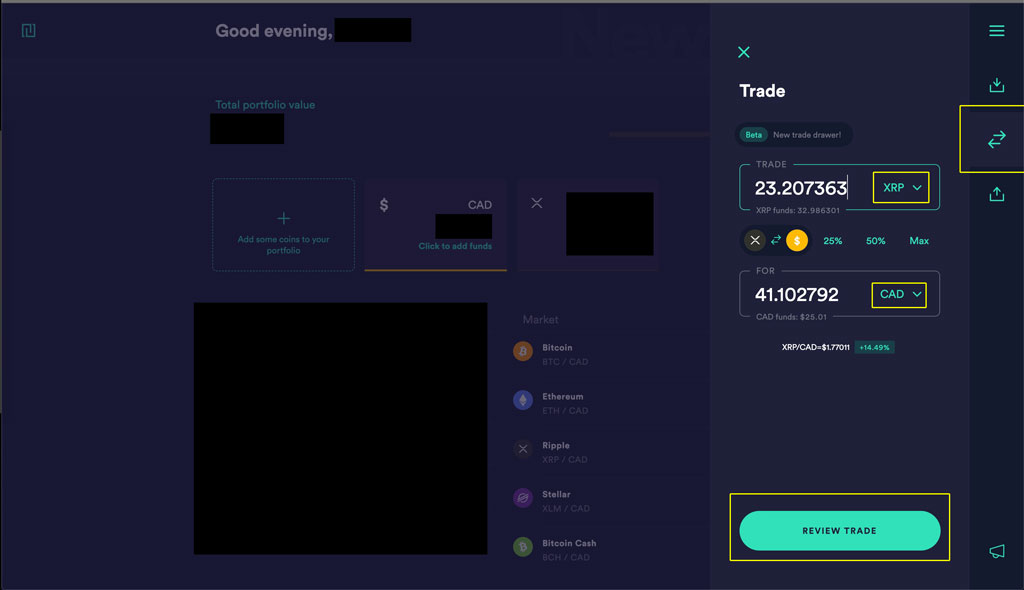
When it has arrived in your account, we will now convert your XRP Coins into Canadian Cash. You will click on the “Trade” button on the right. After, make sure in the “Trade” section, you select “XRP” and the “For” section you select “CAD”. Enter the amount of XRP Coins you want to trade for Canadian Cash and click on the “Review Trade” button.
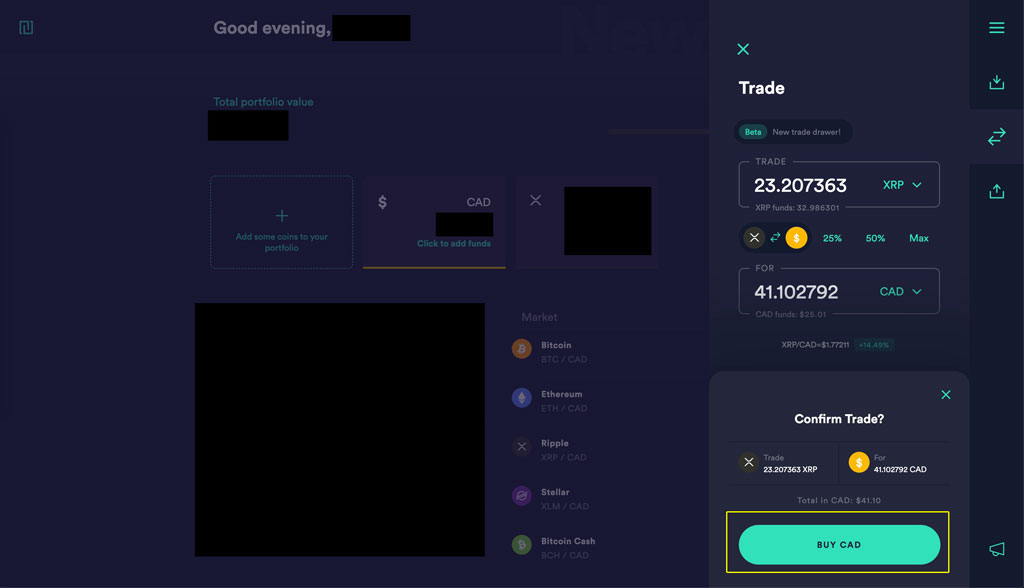
Next, you will get a confirmation message. If the numbers look good, click on the “Buy CAD”.
Congratulations, you have successfully traded your WAXP Token -> USDT -> XRP Coin -> Canadian Dollars.
Step 10: Withdraw your Canadian Dollars via Interac e-transfer
Note: This was copied from the NBA Top Shot section. The screenshots may look a tad different from the above.
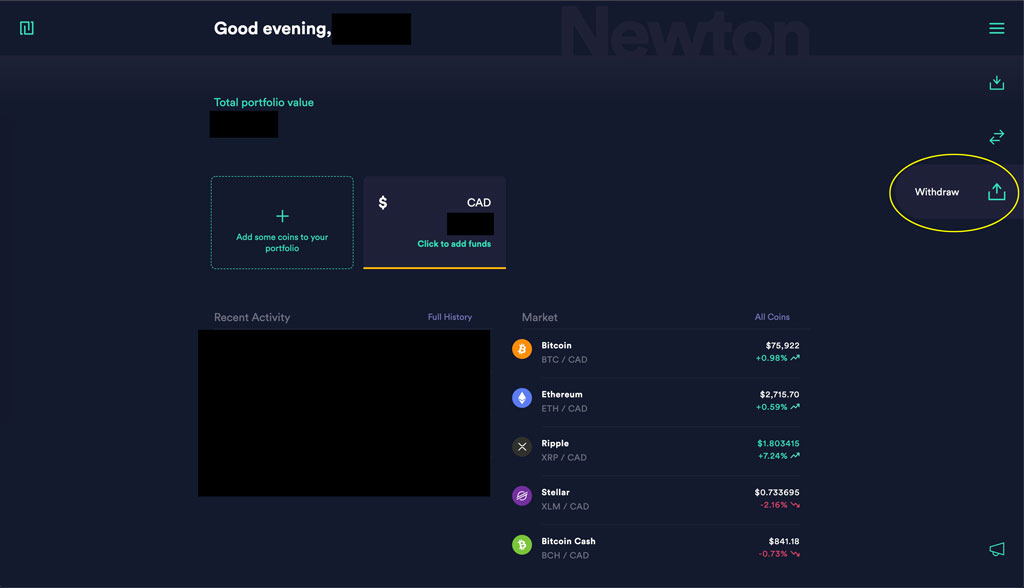
Finally, we can now transfer your Canadian Cash via Interac e-Transfer. Click on the “Withdraw” button on the right.
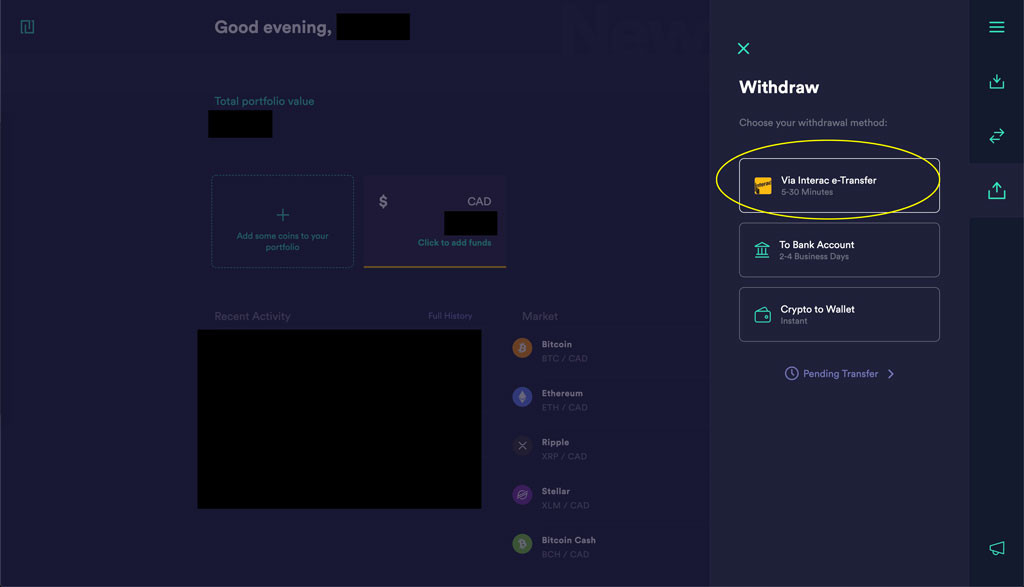
Next, select “Via Interact e-Transfer”. You can also select “To Bank Account” if you set this up. I find e-Transfer faster and easier.
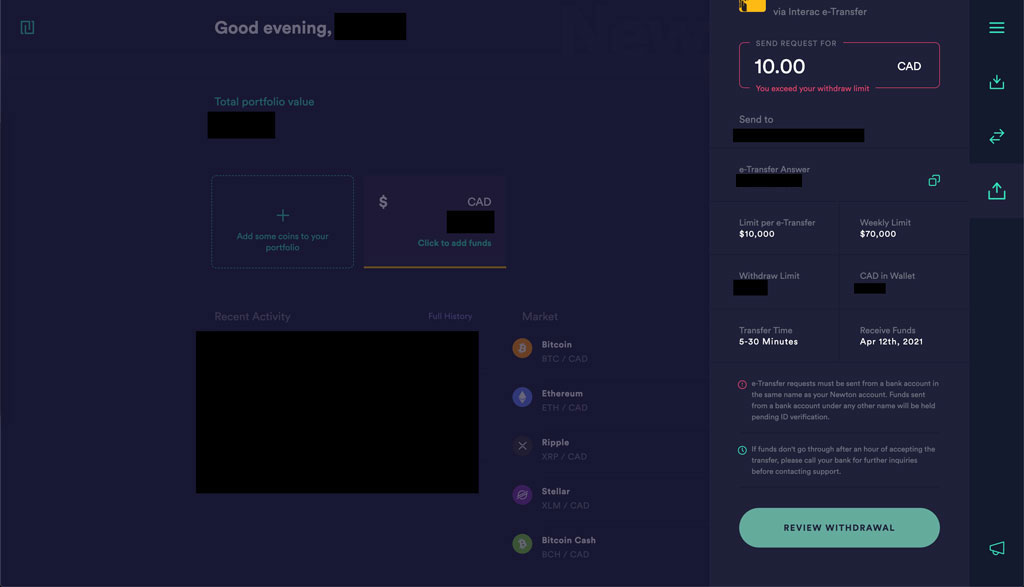
Next, enter the amount you want to send. Make sure the email is correct as well. You must send at least $10 Canadian Dollars. When you are done, click on the “Review Withdrawal” button.
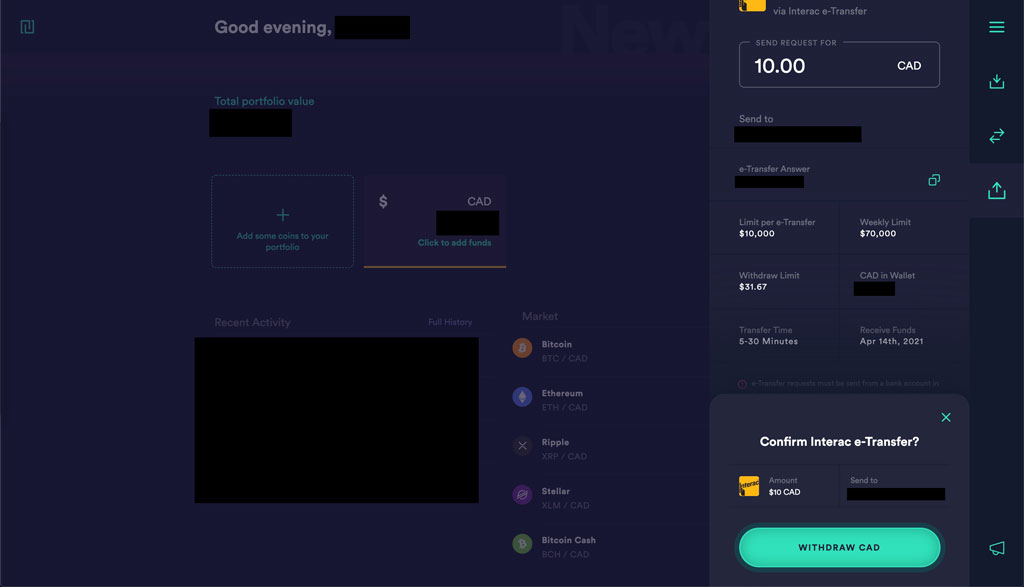
Once you have clicked the “Review Withdrawal” button, you will get a confirmation popup. When you are ready, click on the “Withdraw CAD” button.
If everything is good, you will get a success message. Now, wait for the Interact e-Transfer email to be sent to you and the rest should be straight forward as if you were to receive an e-Transfer some an individual.
Congratulations, you have completed the guide. Enjoy your cash 🙂
If you have any questions, don’t hesitate to contact us at: npnoffers@gmail.com.